Saturday, March 5, 2011

Savory Biscotti

No, that is not a typo. Savory Biscotti.


You may be thinking that biscotti is hard, italian cookie that is enjoyed in the afternoon with coffee or a light dessert treat. These are all true but did you also know that this cookie can be *gasp* savory?!

Yes, Giada said so.

She is God when it comes to anything italian.

Making sweet things savory us actually nothing new. In case you didn't know (which  I didn't so its okay ;)) a cracker is pretty much a savory cookie. They are made mostly the same way. Beginning by creaming butter and adding in flavorings. For cookies, sugar is usually added in with the butter but for crackers, it can be anything from cheese to different seasonings.

These crackers are flavored using some classic italian ingredients: goat cheese, pecorino, and herbs de Provence. They simply melt in your mouth and are perfect paired with almost any kind of dinner. Soup for dipping, salad for scooping, or butter for spreading.

Biscotti is not hard to make. Make these. You'll thank me later. Or maybe now.

Savory Biscotti
Recipe Adapted From: Giada De Laurentiis 

2 C. All purpose flour
1 stick butter, softened
3 oz. softened goat cheese
3 tbs. grated pecorino
3 tbs. herbs de Provence
3 tbs. sugar
1 tsp. sea salt
1/2 tsp. pepper
1 1/2 tsp. baking powder
2 eggs beaten, at room temperature

Directions:
Preheat oven to 350 degrees. Make sure the rack is in the center of the oven.

In a medium bowl, whisk together the flour, baking powder, salt, and seasonings. Set aside. In a large bowl, cream together the butter, goat cheese, pecorino, and sugar. Slowly beat in the eggs until well combined. Add the flour in batches and mix in until just combined. 

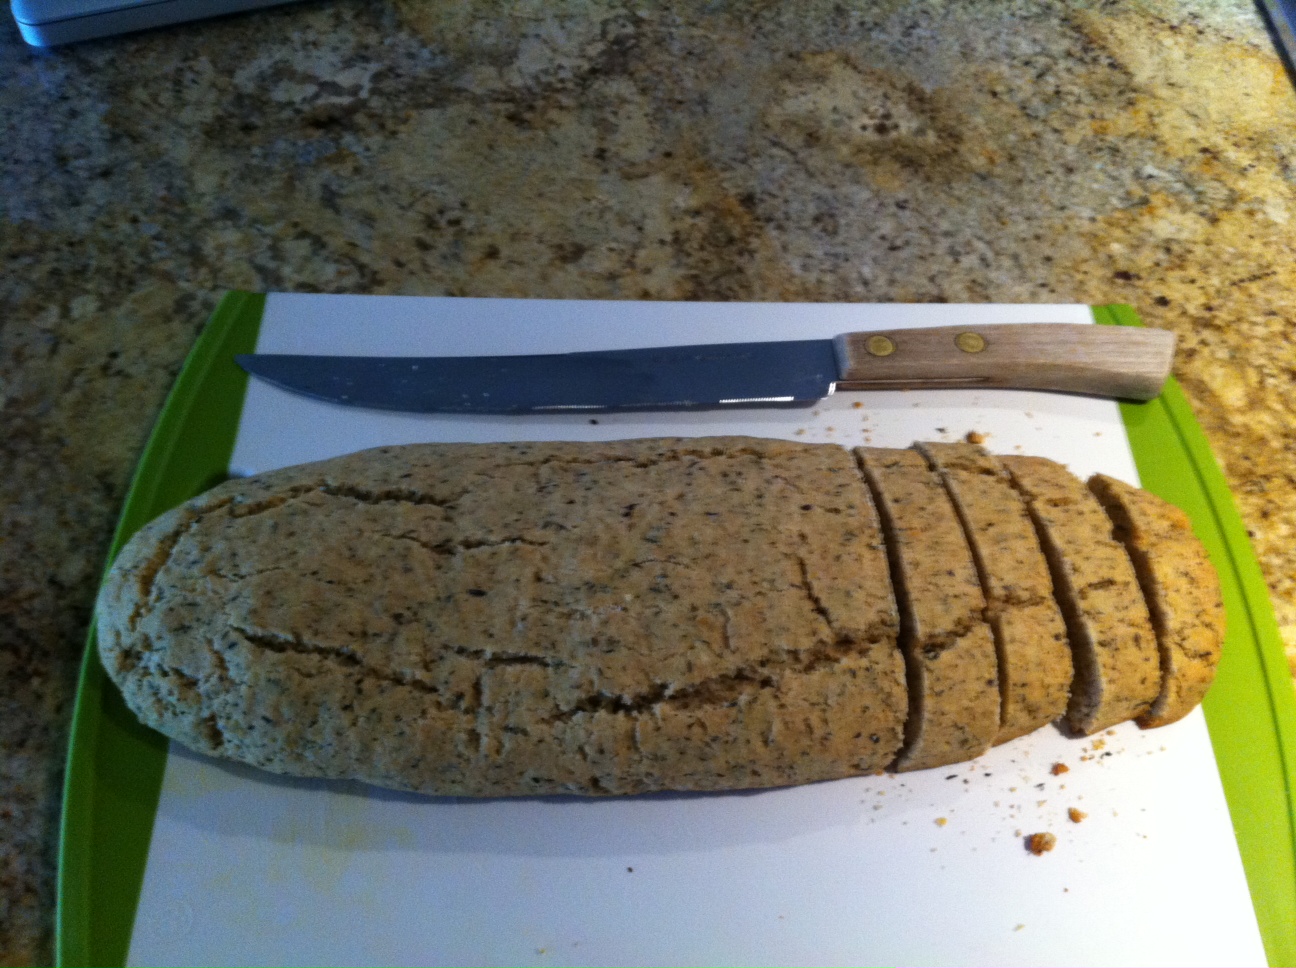
Wet your fingers and for, the dough into a long log. 
Bake until a light, golden brown color. Cool completely before moving onto the next step. 

Once log is completely cooled, slice into biscotti shapes, about 1/2 inch thickness. Place cut side up on a baking sheet and bake for 15 minutes. Flip and then bake another 15 minutes until golden on all sides. 

May be stored in an airtight container for up to one week. 

Thursday, March 3, 2011

Black Bean and Edamame Salad


I am a salad lover. Often, I watch the Today show and they have a nutritionist on there named Joy Bauer. She answers frequent questions about healthy eating and and dieting. She talks about how if you don't like salads you shouldn't "suffer" through them.

Suffer through a salad?! Who could suffer through a salad? Certainly not I.

Especially one as delicious and flavorful as this. This salad is filling and satisfying without the need of any added protein. The edamame and black beans add filling protein, fiber, and flavor that is very satiating. I made this for meatless Mondays and bulked it up by tossing it with raw spinach and red leaf lettuce to get a really delicious dinner. Adding a piece of grilled chicken would certainly be alright, but I enjoyed mine with this lovely savory biscotti. (Recipe coming tomorrow!)


If you are trying to get more vegetarian meals into your life, this may be the way to go. Beans and pure soy protein give a great heftiness to this dish and you didn't even need to break out a skillet!

When you hear the word "biscotti", you would often think of a traditional hard, italian cookie. This, however, is more like a cracker. Flavored with pecorino and tangy goat cheese, it makes a great contrast to almost any meal. (And has great scoop-ability, especially for this salad ;) )

Black Bean and Edamame Salad
1 Can Black Beans, drained and rinsed with the liquid reserved
1 C. Edamame, shelled
1 English cucumber
1/2 C. cherry tomatoes, halved
1/2 red onion, minced
1/4 C. Cilantro, coarsely chopped
1/2 red pepper, chopped

Dressing:
juice of 1 lime
drizzle of olive oil
2 tsp. dijon mustard
1 tbs. reserved black bean liquid
1/2 tsp. sriracha or any hot sauce
2 tbs. prepared salsa
1 tbs. apple cider vinegar
Salt and Pepper

Directions:
Combine all salad ingredients in a large bowl. Combine all of dressing ingredients in a measuring cup and whisk to combine. Pour over salad, only enough to moisten. Let sit for minimum 1 hour to  overnight. The longer this salad sits, the better it gets as all of the juices from the vegetables are released and flavor the dressing. 

*Note: I let this salad sit overnight so there was clearly enough dressing in the salad to toss with extra greens for a more filling dish. Enjoy!


Monday, February 28, 2011

Oatmeal Raisin Cookies

I finally have an outlet for baking. Isn't that fantastic?

It's my work.

Unlike family, my work does not criticize cookies and/or baked goods. They welcome the sugary goodness to get through the long haul that is a dinner rush.

I have been looking to try oatmeal raisin cookies for a while now. They are an American icon as well as a classic combination. Spices, oats, raisins, sugar? Need I say more. 

These cookies are the perfect combination of sweet and spicy. I searched a while for an oatmeal raisin cookie that was worthy enough, but most of them were the same standard. So I took a few recipes and smushed them all together to make one I thought would work best. 

I believe in butter in cookies. Sorry, but the flavor and texture that butter gives to cookies is unlike anything else and it simply cannot be substituted. I even looked at "healthy" oatmeal raisin cookies (I know, please don't scorn me). I believe that some baked goods can be made healthy, but cookies simply cannot. I knew that if I tried to make these cookies healthy, I would be paying a price and they would probably be like a dried oatmeal muffin top. And that is not a cookie. 

Spiced Oatmeal Raisin Cookies
Makes about 3 1/2 dozen
1 C. Butter at room temperature
1 1/2 C. Brown Sugar
1/2 C. White sugar
1 2/3 C. Flour
3 C. Oats (not quick cooking)
2 eggs, at room temperature
1 teaspoon cinnamon
1/4 tsp. nutmeg
dash of allspice
dash of clove
dash of ground ginger
1 scant teaspoon salt
1/2 tsp baking powder
1 tsp baking soda
1 C. Raisins (dredged in flour)
1 Tteaspoon vanilla extract

Directions:

Preheat oven to 375 degrees. 

Begin by creaming the butter and sugars together. If you have stand mixer, this needs to be done for about 5 minutes. This step is crucial as the butter and sugar need to be completely incorporated before  you can move on. 

Meanwhile, sift together the flour, baking soda, spices, and baking powder.

Add in the eggs one at a time to the mixture of butter and sugar, taking care to incorperate fully. Next, add in the vanilla extract. Finally add the dry ingredients to the wet mixture in two additions. 

Finally, fold in the oats and raisins. It is important to dredge the raisins in flour so they do not all clump together in a large mass. Scoop out  dough onto cookie sheets in about 1 1/2 inch balls. Chill the dough for about thirty minutes. This step is extremely important for these cookies. Chilling the dough allows the center to remain soft and gooey and the outside to become crispy. 

Bake for about 8-12 minutes until edges are golden brown. Remove and allow to cool on cookie sheet for at least 3 minutes before moving to a cooling rack.

Look at all those lovely nooks and crannies. MMMMM cookies. 

Sunday, February 27, 2011

Chicken Cacciatore

I love one pot meals. It is so easy, everything cooks together and develops a fantastic flavor. I am particularly partial to making meals like this because of this enormous dutch oven. 
Isn't she a beauty? I think so. 

Anyways, onto chicken. How many different ways are there to make chicken? Ten thousand? Ten million? Whatever the number the possibilities are endless for what you can do with it. You can make soups, stews, stir fries, casseroles; its incredible how versatile it is. 

I had been wanting to make chicken cacciatore for a while now, mostly because of the flavor profile. I love the anise flavor of fennel and the complexity it adds to the dish. Combined with the sweetness of the tomatoes, this dish is definitely a winner. My family gobbled it up so fast I didn't even get to take a finished product picture! 

Traditionally, this dish is supposed to be served over pasta, but I decided to pass on this just because I am not that big a fan of pasta. However, I'm sure it would be delicious. 

Chicken Cacciatore 
Serves 4-6
1 Whole chicken, cut into 8 pieces
1 bulb fennel
3 garlic cloves 
2 tablespoons extra virgin olive oil
1 Zucchini
1 Yellow squash
6 oz. cremini mushrooms
1/2 lb. Asparagus
1/2 yellow onion
1/4 C. Flour
1/2 C. Dry red wine*
2 tbs. tomato paste
28 oz. can crushed tomatoes, low sodium
1 tbs. dried basil
1 tsp. dried oregano
1/4 C. fresh parsley
salt and pepper to taste

Directions
Preheat a large dutch oven to medium heat. Add in some olive oil and allow to get hot. Dredge the chicken in flour and begin browning the chicken in the dutch oven. You do not want to cook the chicken yet, just get a nice, brown crust on both sides. The chicken finishes cooking later. This process should take about two batches with the chicken cooking about 2-3 minutes on each side. 

When you have finished browning the chicken, remove and set aside. In the same dutch oven, begin by sautéing your onion on medium low heat. Take care not to burn the onion. After about five minutes add in the fennel and continue to cook for about 5 more minutes. Once the fennel and onion have sufficiently softened, add the rest of the vegetables: zucchini, yellow squash, mushrooms, and asparagus. Cook for about 10-15 minutes to soften up the vegetables. 

Once the vegetables have softened up nicely, you are ready to deglaze the pan with the wine. (Traditionally, cacciatore is deglazed with white wine, I personally like the robust flavor that red wine gives to this dish but you can use whatever) Cook for about 3 minutes before adding the tomatoes, chicken, and herbs into the mix. 

 Put the lid on and allow to simmer for 30 minutes. 

After 30 minutes, remove the chicken and cover. 

Simmer the sauce for an additional five minutes to allow it to thicken.

Serve the sauce over the chicken with a nice piece of crusty bread or on a bed of pasta. Enjoy! I wish I had a finished product picture but it was so good It was gobbled up so fast. 


Wednesday, January 26, 2011

Fudgy Brownies


I have been searching and scouring the internet for a decent brownie recipe. Sure, I found the ones that were doused in butter and melted chocolate, then topped with a decadent cream cheese frosting. But, did I really want to consume something that could count for at least one meal..or worse..the whole pan?!

I had to find an alternative.

Craving chocolate ooey gooeyness, I discovered this recipe that is courtesy of Jillian Michaels.

I know, I know, how could this muscular goddess have produced a recipe worthy of my blog? Well, she has succeeded. After reading many reviews of this brownie, I had to try it. I did make a few adjustments, but most of the recipe is her own. These brownies are decadent and a calorie bargain. If you portion them out correctly, they are only 85 calories each! Ca-ching!

Fudge Brownies
Adapted from: Jillian Michaels, Master Your Metabolism Cookbook
Olive oil spray for pan
2/3 C. Honey
1/3 C. Cocoa Powder
1/2 C. Whole Wheat Flour
1/4 tsp. baking soda
1/4 tsp. baking powder
1/4 tsp. salt
1/2 C. Unsweetened Applesauce
2 tbs. olive oil
1 large egg, at room temperature
1 tsp. vanilla extract
t tbs. prepared coffee or espresso
1/4 c. chopped chocolate chips

Directions:
Preheat oven to 350 degrees. Spray 8x8 in. pan with cooking spray.

Place honey in a measuring cup and microwave until bubbly, about one minute. Mix in cocoa powder and set aside to cool. 

In a small bowl combine flour, baking powder, baking soda, and salt. set aside.

In a large bowl combine cooled honey, applesauce, egg, oil, coffee, vanilla, and chocolate chips. Combine the wet with the dry, taking care not to over mix. 

Bake until edges look dry and a toothpick inserted in the center comes out with moist crumbs. Cool completely before cutting into 16 even squares. Will keep room temperature for up to 3 days, or longer in the refrigerator. 

Tuesday, January 25, 2011

Zucchini Carrot Quick-bread

I feel bad calling this a "bread."


It is so good it has to be considered a cake..I mean how can it not be considered a cake? Moist? Yes. Great texture? Yes. Frosting? Nope..okay it's a bread..that tastes like cake.


The thing that makes this "bread" so redeeming is the fact that it is made with all natural ingredients including two different vegetables (!) But you would never know they were in there..my dad sure didn't. 


I walked downstairs this morning and discovered there was only a quarter of the bread left. Hmmm..who consumed most of the confection? I had one slice. My dad claims he had one slice. My mom..


..culprit determined. 


ANYWAYS, this bread is delicious. Perfect as a dessert, breakfast, or an afternoon snack. Plus the lengthy list of natural ingredients makes it good for you!


Right?


Zucchini Carrot Bread
Adapted from: Whole Foods

Ingredients:

Natural cooking spray 
1 1/2 cups whole wheat pastry flour 
1/2 teaspoon salt 
1/2 teaspoon baking soda 
1/2 teaspoon baking powder 
1 teaspoon ground cinnamon 
1/2 teaspoon freshly grated nutmeg 
1 egg white
1/3 cup expeller pressed canola oil or vegetable oil
1/3 cup unsweetened applesauce 
2 tablespoons nonfat plain yogurt
1/2 c. lightly packed brown sugar
2 tbs. Honey
2 Tbs. Agave
2 teaspoons vanilla extract 
1 medium grated zucchini
1 medium grated carrot
1/3 cup finely chopped almonds
raisins and almonds, for garnish
honey diluted with water, for garnish


Directions:

Preheat oven to 325°F. Spray an 8-inch loaf pan with natural cooking spray and set aside. 

In a large bowl, sift together flour, salt, baking soda, baking powder, cinnamon and nutmeg. In a separate bowl, whisk together egg white, oil, applesauce, yogurt, sugar, honey, agave, carrot, zucchini, and vanilla. Add flour mixture and fold until well combined, be careful not to over-mix. Fold almonds last then transfer batter to prepared pan. Top with almonds, raisins, and brush with diluted honey and water. Bake until risen, deep golden brown and a toothpick inserted in the middle comes out clean, 50 to 60 minutes. 

Cool in pan on rack for 30 minutes then remove bread from pan and continue cooling on rack.


Chipotle Chicken Chili with Avocado and Greek Yogurt

Chipotle Chicken Chili with Avocado and Greek Yogurt


This chili was inspired by our tough economy. Our family has been hit so we have been trying to turn ordinary ingredients and leftovers into great dishes. I hope you enjoy it!  


I submitted this recipe to the today show recipe contest..hope I win!! Cross your fingers!


Ingredients: 
1 lb ground chicken, or 4 leftover chicken breasts shredded 
2, 15 oz. can black beans 
2, 15 oz. cans kidney beans 
2, 15 oz can low sodium diced tomatoes, pureed 
1/2 a jar marinara sauce 
1/4 c. raisins, pureed with adobo 
1/2 a can chipotle in adobo, pureed 2 tbs. tomato paste 
2 stalks celery, chopped 2 carrot sticks, chopped
1 medium yellow onion, chopped
4 cloves garlic, minced 3 tbs. chili powder
1-2 tsp. cayenne (or less if cooking time is diminished..it mellows!) 
2 tsp. cumin 
2 tsp. paprika 
1 tsp. oregano 


Directions: 
First start by pureeing all of the ingredients in a food processor to get the mise en place ready. The tomatoes, chipotles, and raisins. Set aside. If using raw ground meat, brown the meat in a large dutch oven and then re move to set aside to drain off any extra fat. If using leftover meat, this step can be skipped.


Chop all of your vegetables up and add to a large dutch oven and saute over medium heat in the same dutch oven. Once they have softened and gotten some color (about 10 minutes) add in the tomato paste, chipotles, raisins, garlic, and chili powder. Cook for another two minutes. Add in about 1/4 cup of water to deglaze the dutch oven slightly before you add any of the extra ingredients. 


Add in the remaining ingredients: tomatoes, drained and rinsed beans, spices, marinara sauce, and meat.


Bring to a boil and lower heat and simmer for at least 2 hours, if not longer. Enjoy topped with jack cheese, avocado, and greek yogurt. A side of cornbread never hurt either. Cooks note: the first time I made this chili, I simmered it for about 2 1/2 hours, and the second time I made it, I made it in the morning and it sat on the stove all day. The flavor was very developed and decadent.